Lightroom and genealogy
I use Adobe Lightroom extensively in my genealogy.
![]()
Primarily, I use it to catalog, edit and organize my photos. I have thousands.
Then I use plugins to quickly upload the photos to two online locations: Zenfolio, a photo hosting site for photographers, and a WordPress blog I created for articles and other information about my family.
Lightroom and Photoshop are available from Adobe through their subscription plan or you can buy it outright still I think.
I recommend checking out YouTube and other how to sites to learn how to use it properly. This is not meant as a tutorial for using Lightroom or any of the other software or sites I mention, just an example of how I use the features for my genealogy.
Lightroom
Lightroom is the leading photo management program. It saves and maintains all the information about each photo, including captions, cropping and enhancements in its catalog, NOT in the photo – until you export the image.
Think of your collection of files like a library full of books. You can bring a new book into the library, but if it doesn’t get entered into the card catalog, you won’t know it’s there or do anything with it (from Lightroom). Information about that book (synopsis, number of pages, etc.) is entered into the card catalog, not on the book itself.
Folders
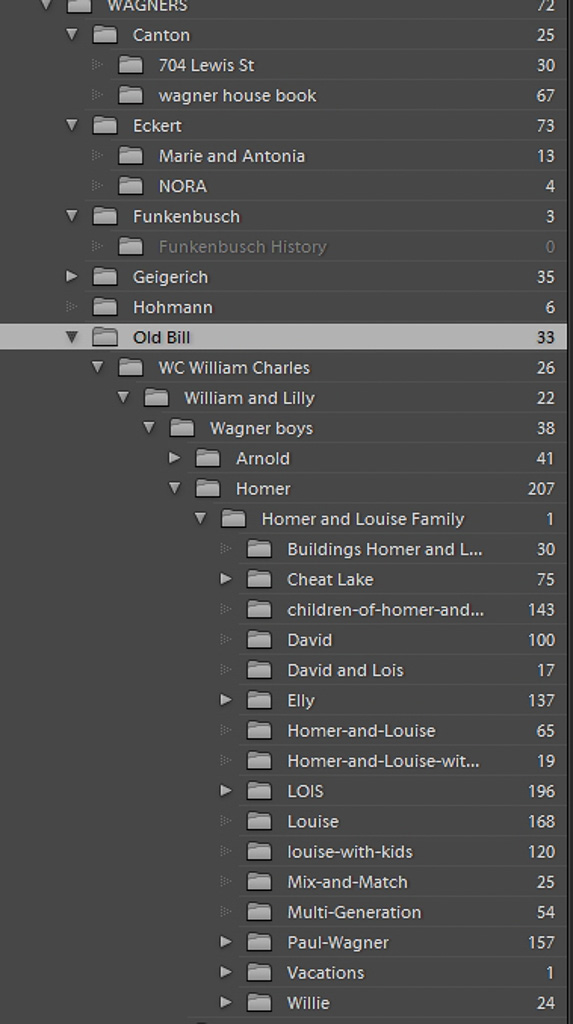
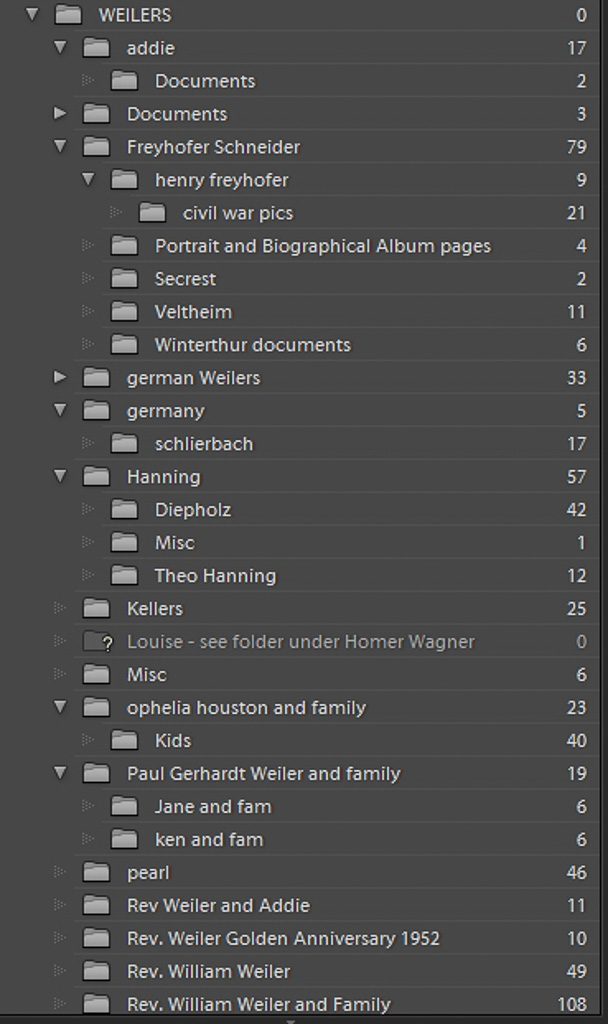
I organize my physical files on my harddrive according to family. I have a main folder for the main family name and then subfolders for individuals, places, etc.
Lightroom Watchfolder
A watchfolder allows you to quickly add images to your lightroom catalog. As I find/scan new photos I just drop it into that folder and Lightroom moves it into my “incoming” folder (kind of like an inbox) and adds it to the catalog. Then, when I go into Lightroom, I open that incoming folder and move the image to the appropriate folder IN LIGHTROOM (very important to do it in Lightroom to keep the catalog up to date).
I try to keyword, caption and edit a photo BEFORE moving it to its correct location so it doesn’t get forgotten.
Metadata
Metadata is a set of standardized information about a photo, such as the author’s name, resolution, color space, copyright, and keywords applied to it. For example, most digital cameras attach some basic information about a file, such as height, width, file format, and the time the image was taken. Lightroom also supports the information standard developed by the International Press Telecommunications Council (IPTC) to identify transmitted text and images. This standard includes entries for descriptions, keywords, categories, credits, and origins.
Metadata is saved inside the file and will follow the file where ever it goes. Think of it like writing the caption on the back of your photo.
However, when you enter the information into Lightroom, it is saved in the catalog only, NOT in the image file – until you ask it to or export the image to a JPG or other format.
Copyright / Source
I add my name as the copyright holder for every photo I physically have in my collection. With the easy availability of digital files online now, I want to be sure it’s clear that this photo is not public domain so it doesn’t show up in some company’s advertising or in someone’s book without my permission. If I get the image from someone else, I put them as the source with no copyright unless they request it.
Keywords / Tags
The real power of organizing photos in Lightroom are KEYWORDS aka TAGS. These allow you to find a photo again no matter where it’s located. But this takes time and commitment to go through every photo and apply the keywords, especially on group photos, which is where it’s most important.
You need to think ahead and consider how you will be using these keywords. One way you’ll want to use them is to create Smart Collections (see below) to automatically collect photos with a certain keyword or combination of keywords no matter what folder they’re located in. In order for this to work, you need to be sure your keywords are unique.
Every person has their own keyword using their full name. Multi-word keywords like names are particularly tricky since Lightroom sees a space as an “or” in a smart collection. So if you create a keyword of “John Doe” and create a smart collection with every photo with the “John Doe” keyword, you will actually get every photo with “John” or “Doe” in their keywords! To avoid this, you need to create a unique version such as adding a dash or other character to make the keyword one word like “John-Doe”.
Another solution is to use initials in the keyword. My grandfather is “Homer Henry Wagner” but if I would use this as the criteria in a smart collection, I’d get every Homer, Henry and Wagner in the catalog. So in order to filter photos with him in it I had to make his keyword read “HHW Homer Henry Wagner” so that I could tell the smart collection to search for “HHW”. I didn’t just use the HHW because someone else may not know who HHW is. Plus I might want to search for every photo with “Homer” to see if there are other Homers in the family. Again, think ahead how you will want to filter and search.
I also add “son of” and “wife of” sometimes for clarity. When you have people of the same name you can add Jr, Sr, etc., but I find by putting “son of x” it is much easier to quickly identify which person you’re talking about. For wives or people who I don’t know their maiden name or full name, I’ll put the relationship such as “wife of x” in the keyword. For example “Anna wife of Amiel Freyhofer”. This nice because it also means she will show up when Freyhofer is searched for.
I also use keywords such as document, house, car, civil war, and anything else I might want to find quickly later on. So the birth certificate for Addie Hanning has the keywords “Addie Hanning” “document” and “birth certificate”. Here is a list of some of the non-name keywords I use: gravestone, document, birth certificate, house, wedding, car, train, unrelated, unknown, obituary, map, Bible. I also have a “neat” keyword that I attach to any photo that is just “neat” for which I have a collection.
When you export your images to jpgs, the keywords are saved in the metadata part of the file.
Smart Collections
Smart Collections automatically create an album of photos with certain criteria (keywords, words in the caption, date, source, etc). Collections are generated fresh each time you click on it, so as you add new photos with that criteria they will appear in the collection. I use mostly keywords and captions to create my collections, and occasionally will add a specific folder to the mix. For example, if I want to show every photo I have of Addie Hanning, I first point to the folder that I created for her. But because she also appears in group photos in other folders I add the criteria of “Addie” to include every photo of Addie no matter what folder it’s located in (she is the only Addie in my keywords). I also created a separate smart collection of “Hanning” which would include Addie (because she has Hanning in her keyword) along with every other person with Hanning in their keyword.
As I mentioned above, you might need to alter your keywords so you can find just that person by making the name one word with dashes (Addie-Hanning if there are other Addies) or include initials in the keyword (HHW Homer Henry Wagner). When you start making your collections, you’ll discover where you need to change your keywords when images that don’t belong are included because they contain the same word that is in the keyword you want.
Another collection I created was for “trains”. As I tagged and captioned photos, I made sure to add the keyword “train” to any photo that contained a train. Obviously all these photos will be scattered throughout the collection in all different folders. The smart collection automatically gathers every photo with the “train” keyword in one place, and if I add a new photo to my catalog with the train keyword, it will get show up next time I open the train smart collection.
Captions
I also create a caption for every photo. I try to include names, dates, places, ages, and the why (gathered for a reunion, etc.). I also sometimes include relationships (so and so’s great grandfather) and any other comments. I also try to include transcription of documents if applicable so that the photos can be searched and filtered later. This is important when there are things in the image that are not keyworded so I can still find it later.
Examples:
Marie (right) and Antonia Eckert (middle) with Louise Weiler Wagner holding son Homer Paul (5 months), Eleanor and Lois (right front). March 1944.
L-R (children:) Lois Ann Wagner Thornton, Eleanor Ruth Wagner Burdick, Homer Paul Wagner, (adults:) Louise Weiler Wagner, Antonia Eckert (related to Lily Giegerich Wagner). Taken at 310 Pike St., Houston, PA, May 11, 1947, home of Louise and Homer Wagner. Notice Lois is holding a camera.
Christiane Henrietta Elizabeth Wagner, wife of William Funkenbusch. From unknown source on Ancestry.com
Former Giegerich grocery run by Uncle Henry. Canton, Missouri. Picture taken 1982. City Hall is white building in back.
Editing photos in Lightroom (and Photoshop)
Lightroom’s second function is to be able to edit, enhance and crop photos. It uses a NONDESTRUCTIVE method. The changes are only permanent when you export the image to whatever format/size you require at the time. You can also open the image in Photoshop, make changes there and then come back to lightroom to finish and tweak.
Occasionally I edit the image first in Photoshop for changes I definitely want permanent (cropping, straightening, etc.). I also use Photoshop for some reconstruction on badly damaged photos that I find easier and better to do in Photoshop with its healing brushes and cloning tools. I always make a layer copy of the image before proceeding, and use layers to keep it as nondestructive as possible. Then I finish it into Lightroom with clarity, levels, etc. that can all be tweaked and changed.
Lightroom virtual copies are handy for creating multiple crops and version of photos. I use it to crop individuals from group photos without having to physically create new copies of the image. Or, I may want a black and white version of a color photo.
Zenfolio
I use Zenfolio to host my photographs online (check out my photo site at www.photos.dianathornton.com). I started using Zenfolio for my commercial photography, and then added all my family photos at full resolution to share with family. I keep them in password protected folders, but allow downloads (with another password). This accomplishes several important things. It makes all the family photos available to the family (what’s the use of collecting all the family photos if you don’t share them). It acts as a central depository for everyone to contribute their photos. It allows collaboration with my family to identify and caption them. And it acts as a cloud backup for the thousands of irreplaceable photos in case something happens to the originals or my hard drive (which I have other backups of, but you can’t have too many backups).
If you sign up using my referral code, you get 10% off a new account, and I also get referral credit. They offer something for everyone from Basic to Premium Business plans. There’s a two-week free trial. You can then sign up with my referral code GMB-ZXJ-95G.
I also use the Lightroom plugin by Jeffrey Friedl to upload to Zenfolio directly from Lightroom. I can create albums using smart collections (see above) to automatically collect every photo with a certain person or family name. As I add or update photos, I just hit Publish again and it uploads the new versions automatically.
Lightroom export to WordPress plugin
Photo Upload plugin
I use this plugin to quickly upload jpgs to my family wordpress blog (where you are now). I created this blog to post articles, chapters and other information (I use Ancestry for the charts and database). I like to have a featured image with each article, so this plugin allows a quick export directly to the media gallery of my blog. Then, when I create the post, the image is already uploaded, sized and ready for me to insert into the article. This plugin works with lots of other online blogs and sites.
Related Posts

I am an confirmed user of Lightroom, but a total beginner in genealogy. Your article provides great tips to start an “old photo collection”, thank you !
The most important thing is to get them scanned in. Then concentrate on organizing. Even if they are not identified yet, at least they are digitized in case of disaster. But don’t wait to id/tag once they are in. I still have boxes labeled “scanned” that I need to go through to extract the hand written info from them before I can store the print away.
This post was beyond helpful, thank you so much! I am just getting started on a family genealogy project and have used LR exclusively since it’s inception for my own professional and person photos. However, I’ve never been good at keywording, and want to start on the right foot. One question for you… when you scan documents or images into your computer, do you rename the file itself, or do you just let the metadata include all of the info? If you DO rename, do you have a specific convention that you use? Thanks again for this great info!!
When I first scan a group of photos (such as a shoe box from a cousin), I will name them with something that indicates the source, eg. “cousin emma” and then a sequential number. Then after they are scanned, I add the full source in the SOURCE field in the metadata.
Another naming convention I’ve used is adding NEG when I was scanning our families negatives. This was important because when I discovered duplicates, it was usually because I had scanned both the print and the negative. I usually use the print since negatives don’t scan as well and are often scratched and dirty.